Turn any USB Webcam into an IP Camera on UGREEN NAS using Docker
Did you know that the USB ports on your NAS can be used for much more than connecting external hard drives?
In this tutorial, I’ll show you how to connect an ordinary USB webcam to your UGREEN NAS and convert it into a fully functional IP camera using the free and open-source project go2rtc.
Once configured, your webcam can be used with Frigate, Home Assistant, Blue Iris, Synology Surveillance Station, Agent DVR, VLC, or virtually any software that supports RTSP streams.
If you prefer watching instead of reading, I have also created a YouTube tutorial that walks you through the complete setup.
Step 1: Connect your USB Webcam
Simply plug your USB webcam into one of the USB ports on your UGREEN NAS.
Most modern webcams are UVC compatible and are automatically detected by Linux.
If you’d like to verify that the NAS can see the camera, SSH into your NAS and run:
ls -l /dev/video*
You should see something similar to:
/dev/video0
/dev/video1
Normally, /dev/video0 is the device you’ll use.
Step 2: Deploy go2rtc
You can either use TSG EasyDocker for a one-click installation or deploy it manually using Docker Compose.
Create a folder for the application and save the following compose file as docker-compose.yml.
services:
  go2rtc:
    image: alexxit/go2rtc:latest
    container_name: tsg_go2rtc
    restart: unless-stopped

    ports:
      - 1984:1984
      - 8554:8554
      - 8555:8555/tcp
      - 8555:8555/udp

    devices:
      - /dev/video0:/dev/video0

    volumes:
      - ./config:/config

    environment:
      TZ: Asia/Dubai
The important line here is:
devices:
  - /dev/video0:/dev/video0
This passes your USB webcam into the Docker container.
Step 3: Start the container
Deploy the container.
Once it starts, browse to:
http://YOUR-NAS-IP:1984
This opens the go2rtc web interface.
Step 4: Detect the webcam automatically
This is probably my favourite feature of go2rtc.
Instead of manually writing complicated FFmpeg commands, click:
Add -> FFmpeg Devices (USB)
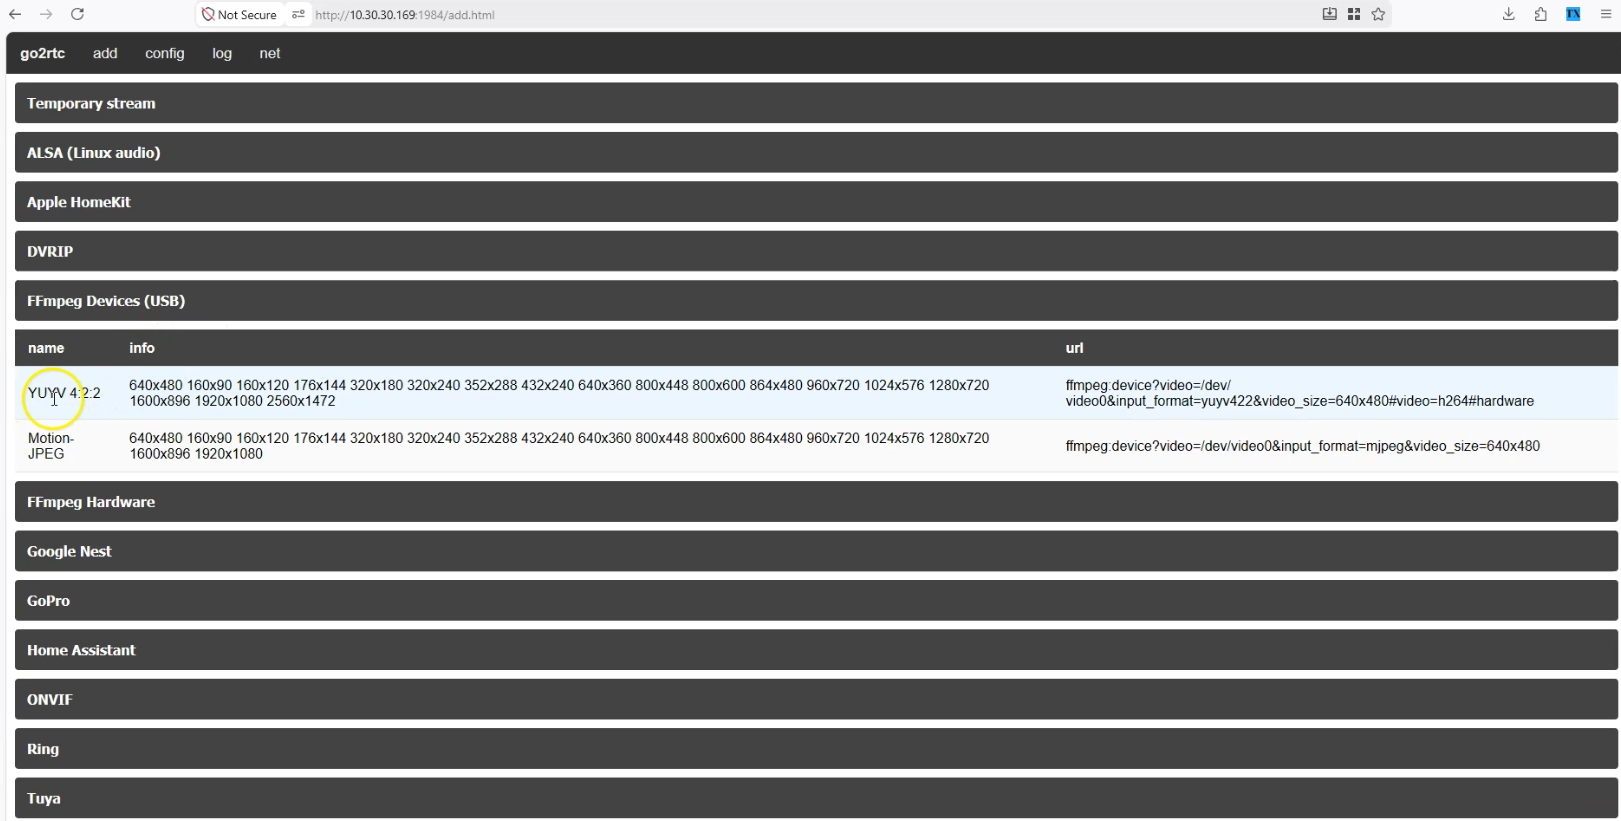
go2rtc automatically detects the USB webcam connected to your NAS and shows ready-to-use stream URLs for the supported formats and resolutions.
Choose the resolution you want, then copy the generated URL from the url column.
For example, go2rtc generated this URL for my Logitech C920:
ffmpeg:device?video=/dev/video0&input_format=mjpeg&video_size=1280x720
Keep this URL handy. We will use it in the config editor in the next step.
Step 5: Add the full configuration
You do not need to create the go2rtc.yaml file manually.
In the go2rtc web interface, click config from the top menu.
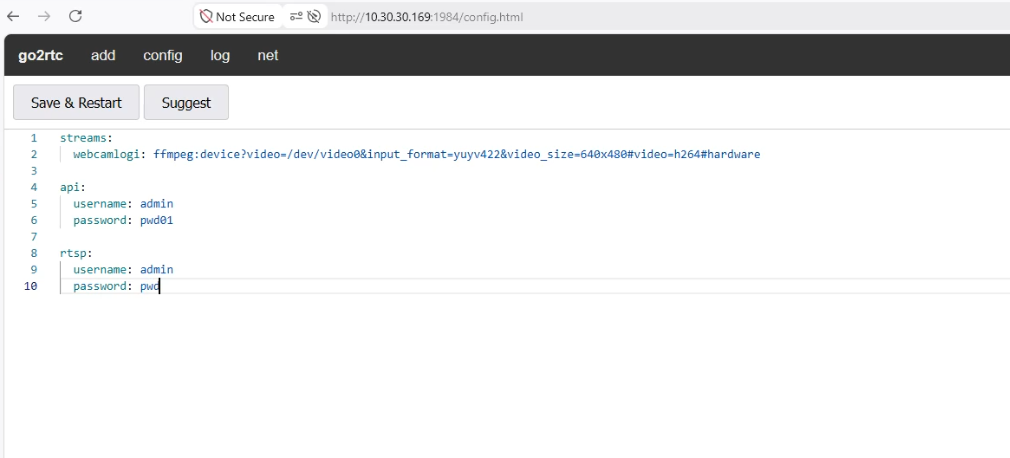
Paste or type the full configuration into the editor. Use the URL you copied from the camera detection screen as the value for your stream:
streams:
  webcam: ffmpeg:device?video=/dev/video0&input_format=mjpeg&video_size=1280x720

api:
  username: admin
  password: your-strong-password

rtsp:
  username: admin
  password: your-strong-password
Click Save & Restart.
This creates the webcam stream and protects both the web interface and the RTSP server using username and password authentication.
Step 6: Test the stream
Open VLC and choose:
Media -> Open Network Stream
Enter:
rtsp://admin:your-strong-password@YOUR-NAS-IP:8554/webcam
If VLC displays the video, your webcam is now functioning as a network IP camera.
Step 7: Add it to your NVR
The same RTSP URL can now be used with:
- Frigate
- Home Assistant
- Blue Iris
- Synology Surveillance Station
- Agent DVR
- VLC
- Any RTSP compatible NVR
Simply add the RTSP URL exactly as you would for any normal IP camera.
Why use go2rtc?
go2rtc is an excellent lightweight streaming server that supports multiple input and output protocols.
Instead of replacing your existing webcam, it allows you to reuse hardware you already own while making it accessible across your network.
The automatic USB camera detection makes the entire setup incredibly simple, even for beginners.
Docker Compose Used
The Docker Compose file used in this tutorial can be downloaded here:
https://gist.github.com/kajain99/c1e514909d8d9a9b98e7333cce19eaa7
What’s Next?
This is the first tutorial in my series on useful ways to use the USB ports on your NAS.
In the next article, I’ll show you how to convert a regular USB printer into a network printer (print server) using Docker.